XPS Ship is a multi-carrier shipping provider that CoreBridge integrates with, allowing you to easily process shipping on your CoreBridge orders.
Integration with XPS will allow your staff to print shipping labels for orders and bring the shipments tracking number and cost back into your CoreBridge system.
Table of Contents
Benefits of Integrating with XPS
- By integrating with XPS, users are able to print shipping labels.
- Shipment details entered into CoreBridge are brought into XPS, avoiding the need to re-enter shipping addresses into a different website.
- XPS Ship allows you to compare shipping rates, types, & carriers on a single screen.
- Set a default markup on your shipping costs, which is automatically added to the order in CoreBridge. You can also manually adjust the shipping if needed.
Signup and Activation
Navigating to Management Module / Global Settings / Services.
1. Click Enroll Now.
Note: The Destinations feature must be enabled in your system for this to show. If you do not see this, please contact our Support department to have this enabled in your system.

2. Select New Account.
3. Enter the Email and Password you wish to use for your XPSship.com account. The system will default a User Name based on your CoreBridge username, but this can be adjusted as needed.
4. Mailing Address and Billing Address information is pulled from your location settings. These addresses can be adjusted as needed.
Note: Location settings can be found in Management Module / Locations / Manage Locations.
5. Click Create New Account.

CoreBridge / XPS Integration Settings
Once the XPS account has been created, you will have the option to set your shipping costs.
Navigate to the Management Module / Global Services / Services.
1. Click CoreBridge Integration Settings.

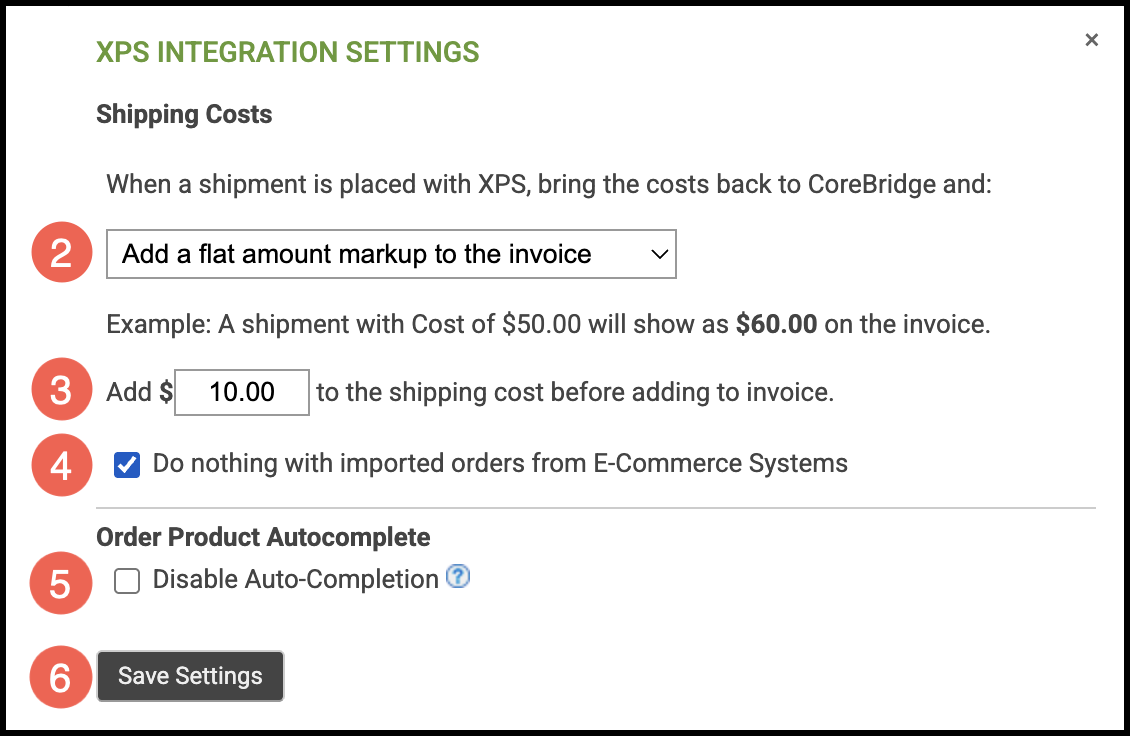
Set how you want shipping costs from XPS to be handled when they are brought back into CoreBridge.
2. Select from the following options:
- Do nothing with the invoice—shipping costs will not be added to the invoice in CoreBridge.
- Add the costs with no markup to the Invoice—shipping costs will be added to the invoice, but no markup will be added to the costs.
- Add a flat amount markup to the invoice—set a flat amount which will be added to the shipping costs when added to the invoice within CoreBridge.
- Add a percentage markup to the invoice—set a percentage markup which will be added to the shipping costs when added to the invoice within CoreBridge.
- Add a margin to the invoice—set a margin which will be added to the shipping costs when added to the invoice within CoreBridge.
3. Add a set amount or a percentage to be added to the shipping cost if desired.
4. Check here for the option to do nothing with orders imported from E-Commerce to be enabled.
5. Checking this will disable the Auto-Completion function when XPS sends an update to CoreBridge.
6. Click Save Settings.
Success! You are now ready to use Destinations & XPS functionality within your CoreBridge system.
Support
If you have any questions about Destinations within your system, please email support@corebridge.net. For all other questions regarding XPSship (such as billing or account questions) please visit https://xpsship.com. XPS can also be reached by phone at 800-881-0288 or email: info@XPSship.com