CoreBridge allows you to customize the email templates used for customer communication. You can update the text within each template and insert placeholders that automatically pull in details from Orders, Invoices, Customers, Users, or Company information to personalize your messages.
Each tab on the Customer Communications page represents a specific system-generated email template, allowing you to manage and tailor the content for different types of outgoing messages.
Table of Contents
Customizing Email Communications Overview
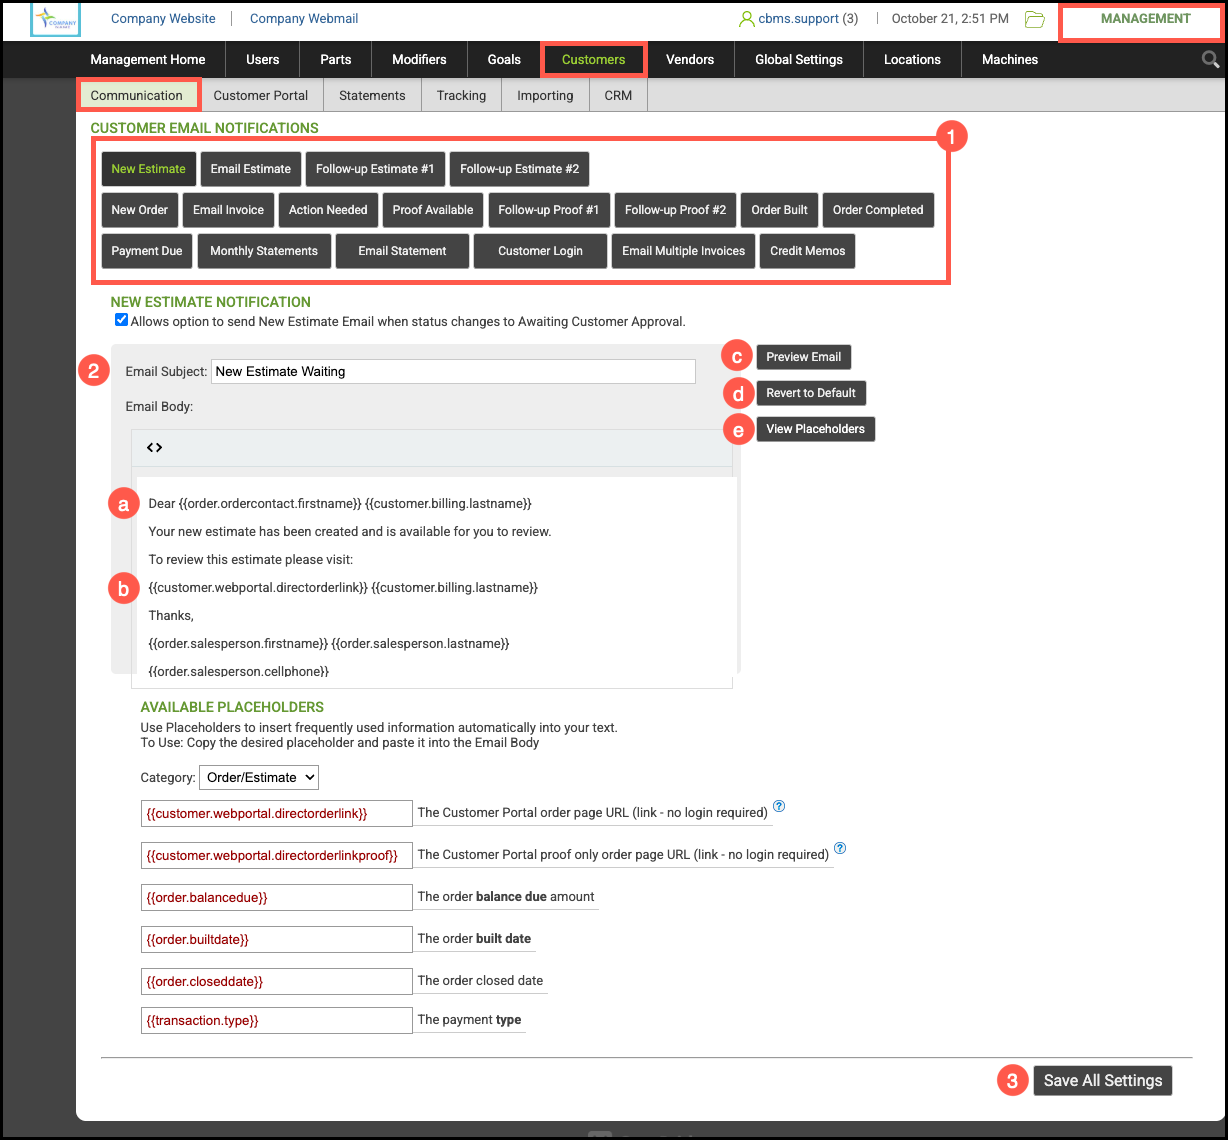
Navigate to the Management Module / Customers . Communications.
1. Select the item you want to edit under Customer Email Notifications.
2. Customize the subject and body of the email to fit your needs.
a. You can edit text outside of the Placeholder brackets.
b. You can replace a Placeholder with another Placeholder.
c. Click Preview Email to view the email and check Placeholders.
d. Click Revert to Default to remove any unsaved changes.
e. Click View Placeholders to be directed to the Placeholders available for this email.
3. Click Save all Settings.
Note: Text within brackets represents a Placeholder, which automatically fills in the correct information when the email is sent. To ensure your templates work correctly, leave the placeholder text as is.
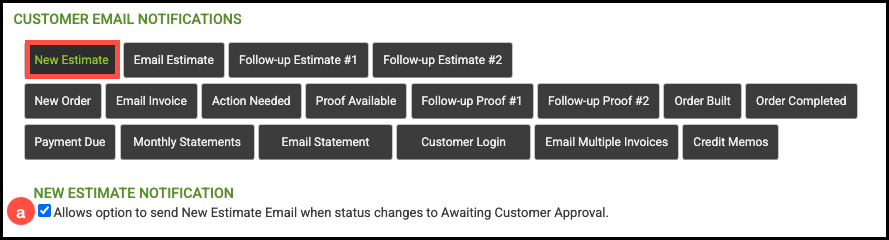
New Estimate
The New Estimate email is a notification that can be sent to a Customer when a new Estimate is created. . The template can be customized to fit your communication style, and you can include Placeholders that automatically populate with the relevant Estimate details.
a. By selecting the checkbox, you can manually trigger this email to send
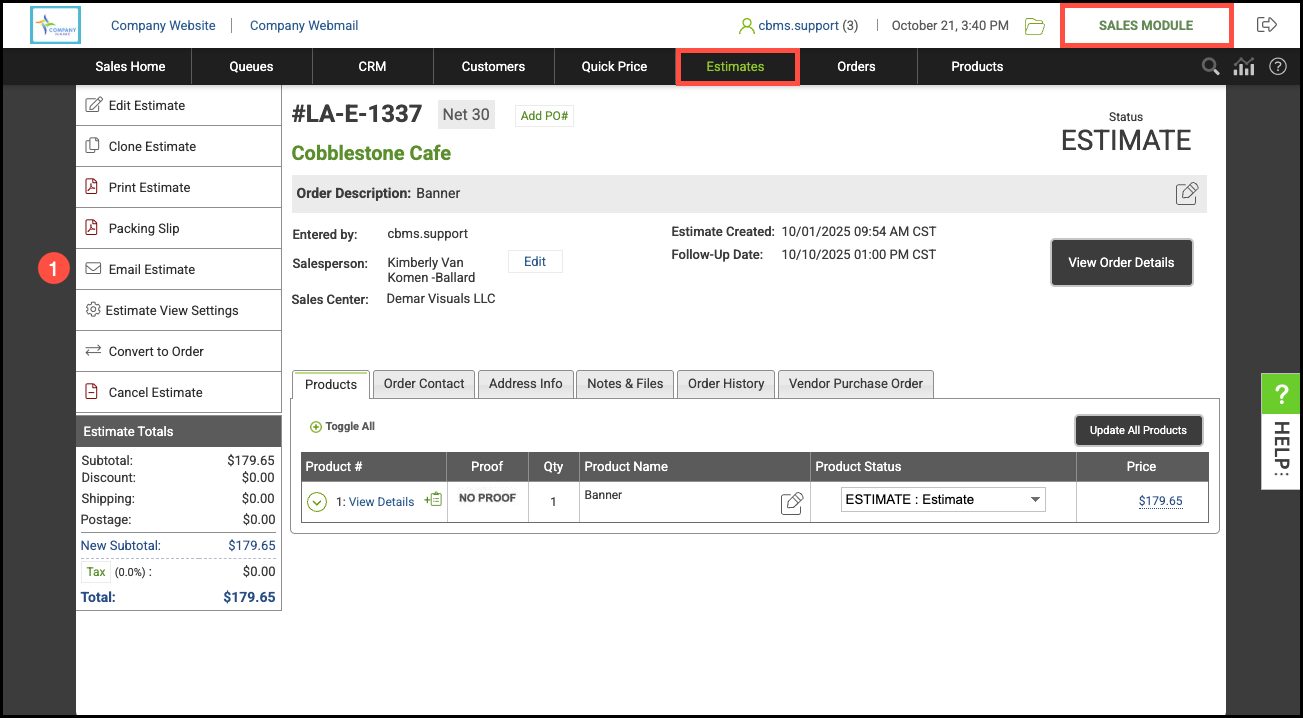
Sending New Estimate Email
The New Estimate Template can be sent in two different ways. Either from the Estimate View Page, or from the Estimate Queue.
Estimate View Page:
Navigate to the Sales Module / Estimates / Search and select the appropriate Estimate.
1. Set Status to Awaiting Customer Approval.
2. Click the Email icon.
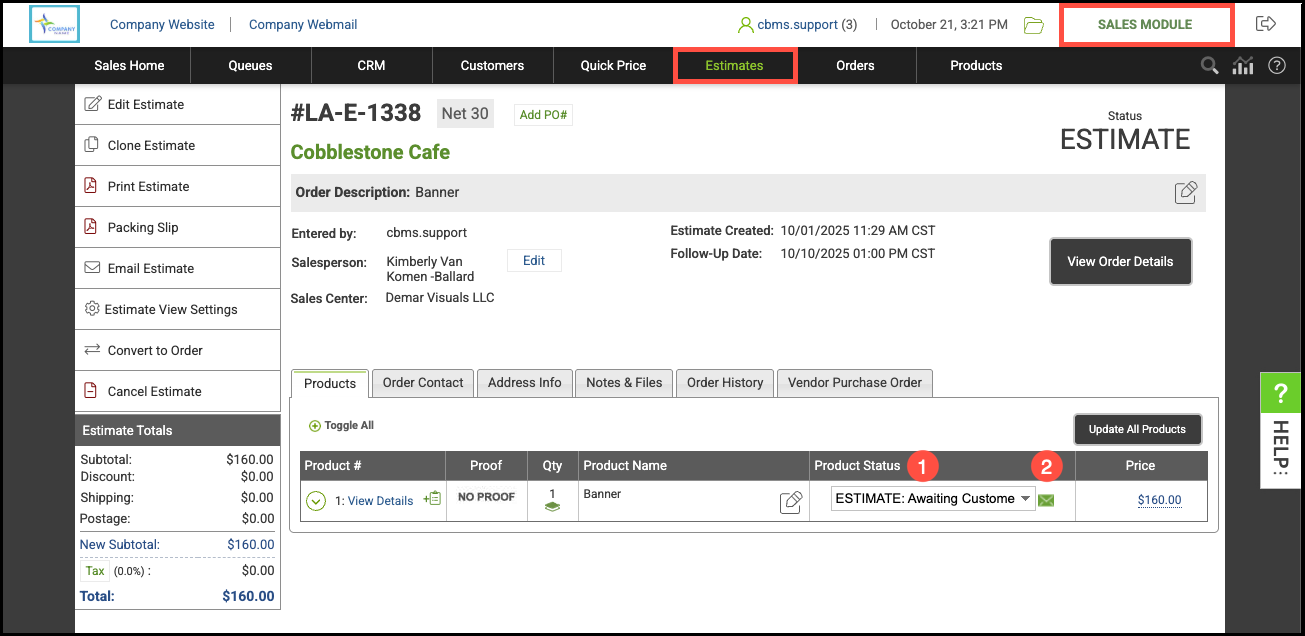
Note:
- The email will pre-populate based on the saved template and can be edited prior to sending.
- This email notification will not include a PDF attachment.
Estimate Queue:
Navigate to the Sales Module / Queues / Estimates.
1. Expand the appropriate Estimate.
2. Update the Status to Awaiting Customer Approval.
3. Click the Email icon.
Note: The email will be pre-populate based on the template and can be edited prior to sending.

Email Estimate
The Email Estimate template is the default email used when sending a Customer a copy of their Estimate. When this template is used, the email will automatically include a PDF attachment of the Estimate for the Customer’s review.

Sending the Estimate Email
Navigate to the Sales Module / Estimates and select the appropriate Estimate.
1. Click Email Estimate.
Note: The email will pre-populate based on the saved template and can be edited prior to sending. It will include a PDF attachment.
Follow-up Estimate #1
Follow-up Estimate #1 is the default template used to automatically send the PDF Estimate to the Estimate Contact after a certain number of days has elapsed since the initial Estimate email was sent.
a. Check this box and use the dropdown to select the appropriate number of days you would like to wait before sending the Follow-Up Estimate #1 email.
b. Check this box if you would like the email to be sent from the Salesperson email address.

Follow-up Estimate #2
Follow-up Estimate #2 is the default template used to automatically send the PDF Estimate to the Estimate Contact after a certain number of days has elapsed since the Follow-up Estimate #1 was sent. This automatic email does not repeat. To re-start the follow-up process, you can manually send either the New Estimate or Email Estimate email communications.
a. Check this box and use the dropdown to select the appropriate number of days you would like to wait before sending the Follow-Up Estimate #2 email.
b. Check this box if you would like the email to be sent from the Salesperson email address.

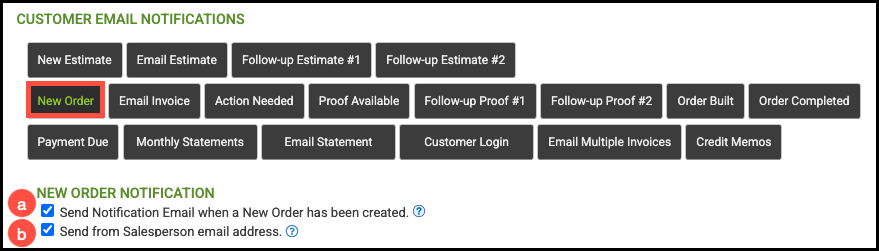
New Order
New Order is the default template used for a customer notification that their order has been placed.
a. When the box is checked, the system will automatically send this email to the Order Contact when a new Order is entered or converted in the system.
b. Check this box if you would like the email to be sent from the Salesperson email address.
Email Invoice
Email Invoice is the default template used when sending a customer a copy of their invoice.
a. Check the box to include the billing contact on all Invoices emailed from the system.

Sending the Email Invoice
Navigate to the Sales Module / Orders and select the appropriate Order.
1. Click Email Invoice.
Note:
- This will include a PDF attachment of the invoice.
- The email will pre-populate based on the saved template and can be edited prior to sending.

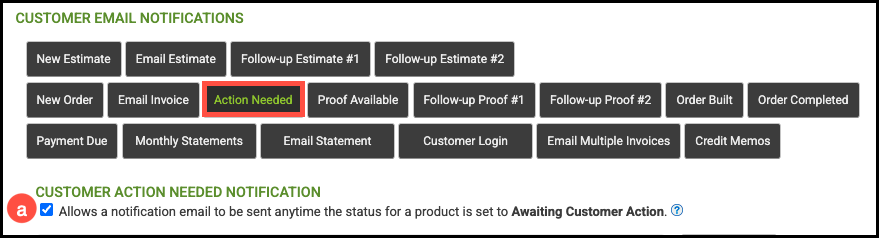
Action Needed
Action Needed is a notification email that can be sent to a customer when Awaiting Customer Action status is set for a Product.
a. Checking the box, allows you to manually send this email.
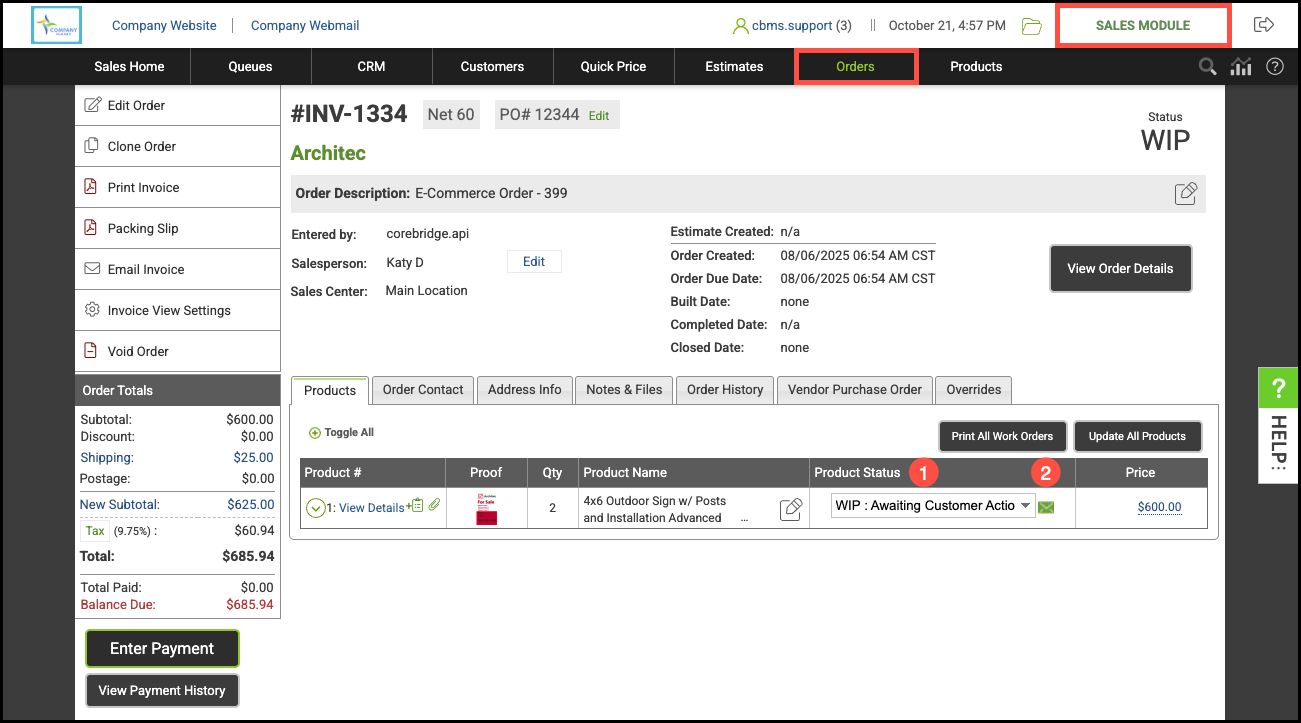
Sending the Action Needed Email
Navigate to the Sales Module / Orders and select the appropriate Order.
1. Set Status to Awaiting Customer Approval.
2. Click the Email icon.
Note: The email will pre-populate based on the saved template and can be edited prior to sending.
Proof Available
Proof Available is a notification email that can be sent to a customer when Awaiting Proof Approval status is set for a Product.
a. Checking the box, allows you to manually send this email.
Note: This template is used for both Estimates and Orders, as well as for new proofs and revisions. Be sure to use wording that applies to all scenarios.

Sending the Proof Available Email
Navigate to the Order or Estimate view.
1. Set Product Status to Awaiting Proof Approval.
2. Click the Email icon.
Note: The email will pre-populate based on the saved template and can be edited prior to sending.

Follow-up Proof #1
Follow-up Proof #1 is the default template used to automatically send the PDF Estimate to the Estimate Contact after a certain number of days has elapsed since the Follow-up Estimate #1 was sent.
a. Check this box and use the dropdown to select the appropriate number of days you would like to wait before sending the Follow-Up Proof #1 email.
b. Check this box if you would like the email to be sent from the Salesperson email address.

Follow-up Proof #2
Follow-up Proof #2 is the default template used to automatically send the PDF Estimate to the Estimate Contact after a certain number of days has elapsed since the Follow-up Estimate #1 was sent. This automatic email does not repeat. To re-start the follow-up process, you can manually send either the New Estimate or Email Estimate email communications.
a. Check this box and use the dropdown to select the appropriate number of days you would like to wait before sending the Follow-Up Proof #2 email.
b. Check this box if you would like the email to be sent from the Salesperson email address.

Order Built
Order Built is the default template used when an order has been marked Built.
a. When the box is checked, the system will automatically send this email to the order contact when an order has been marked Built.
b. Check this box if you would like the email to be sent from the Salesperson email address.

Order Completed
Order Completed is the default template which can be sent automatically from the system whenever an Order status is set to Completed.
a. Check this box to enable automatic emails when the order status is set to Completed.
b. Check this box to include a copy of the Invoice PDF with this email.
c. Check this box to include the Billing Contact on the email.
d. Check this box if you would like the email to be sent from the Salesperson email address.
Note: Options b and c are only available if option a has been checked.

Payment Due
Payment Due is the default template that automatically sends an email for currently Past Due Orders which applies to Cash Customers or Due within 5 days for customers with payment terms.
The Payment Due email does not send immediately when an Order is completed. Instead, it is sent as part of a nightly routine that reviews all completed Orders and sends the notification only when specific conditions are met:
The Payment Due email setting is enabled in Customer Communications.
The Payment Due email has not already been sent.
The date range meets the configured payment terms (for example, NET 30 sends the email 25 days after Order completion).
For Cash Customers, the Payment Due email is sent overnight following the night the Order was completed.
a. Check this box to automatically send this email to the Order Contact five (5) days before payment is due.
b. Check this box to include the Billing Contact on the email.
Note: This email can only be sent once per order.

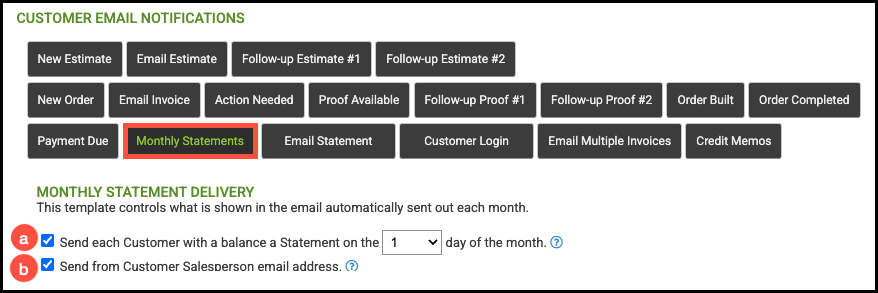
Monthly Statements
Monthly Statements is the default template that can be sent automatically to the customer with an outstanding balance. When enabled, billing statements are automatically sent from the system to the billing contact of customers with an outstanding balance.
Note: Statement emails are always sent to the Billing Contact listed on the Customer record. Only Customers with an outstanding balance will receive a Statement email—no email will be sent if the Customer’s balance is zero.
a. Check this box and use the dropdown to select the day of the month you would like to send the monthly statement delivery
b. Check this box if you would like the email to be sent from the Salesperson email address.
Note: Automatic Statements are not sent out if they already went out within the last 15 days. This is to avoid duplicate statements that could happen if you adjust the statement date in the Management module.
Email Statement
Email Statement is the default template which is used when emailing billing statements to a single customer. You can format the email template to your needs and add the necessary placeholders that will populate when sending a statement.

Sending the Email Statement
Navigate to the Sales Module / Customers and select the appropriate Customer.
1. Click on the Statement icon.
Note: The email will pre-populate based on the saved template and can be edited prior to sending.

Customer Login
Customer Login is the default template which can be sent manually after you've enabled the Customer Portal for a contact. For more information, please see Customer Portal Direct Link Overview.

Sending the Customer Login Email
Navigate to the Sales Module / Customers and select the appropriate Customer.
1. Select the Contacts tab.
2. Select the Contact.
3. Click Enable Customer Portal.
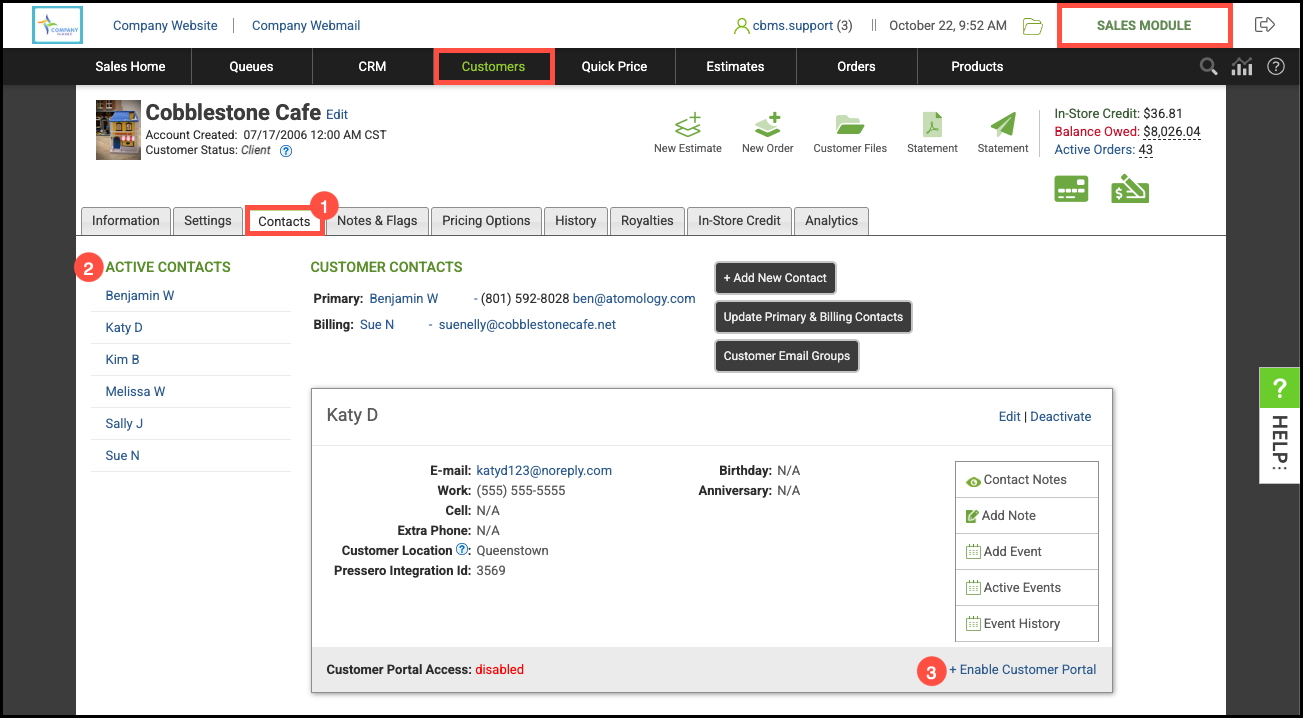
4. Set Enable Access.
5. Click Save Changes.
Note: The email will pre-populate based on the saved template and can be edited prior to sending.

Email Multiple Invoices
This feature allows you to select multiple Orders or Estimates and email them as a ZIP file.

Sending Multiple Invoices
Navigate to the Sales Module / Customers and select the appropriate Customer.
1. Click on the History tab.
2. Select either the Orders or Estimates tab.
3. Click the Selection Mode on.
4. Select the records by clicking on the line.
Note: Selections will be highlighted in green.
5. Click Email or Download.
Note: For more information, please see Email Multiple Invoices or Estimates.

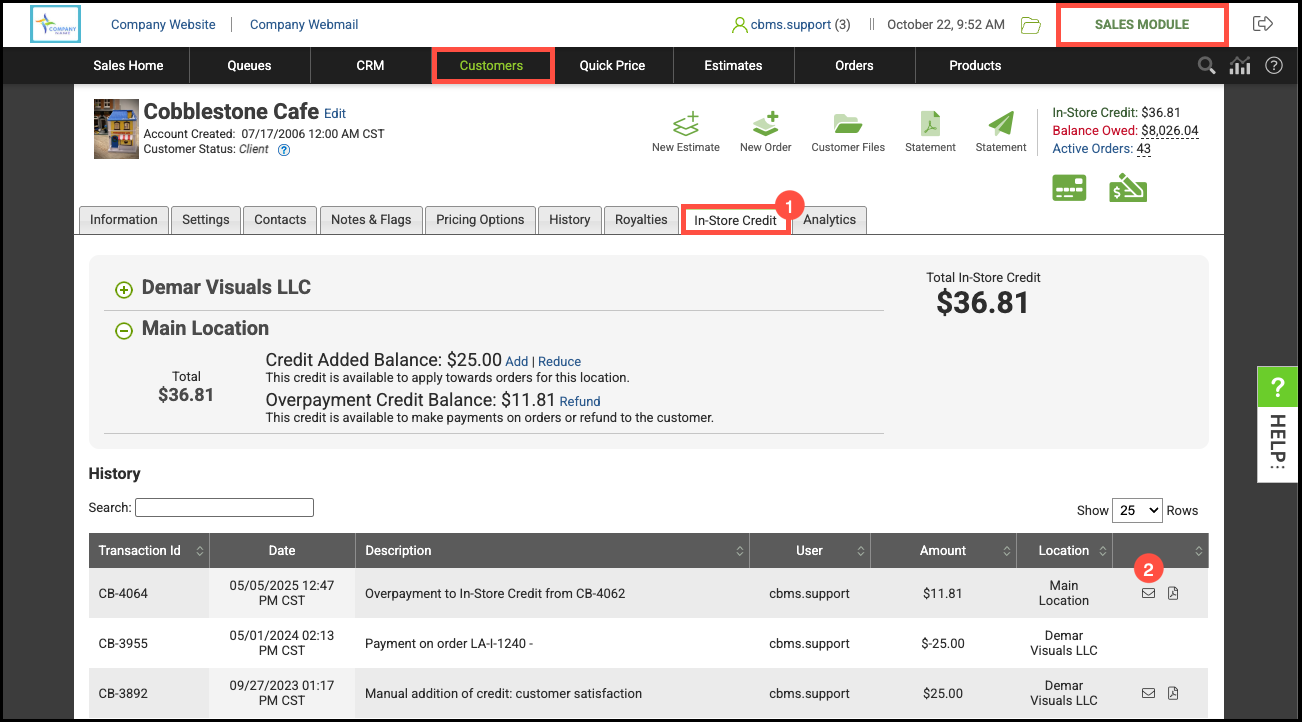
Credit Memos
This allows you to email a Credit Memo statement for an In-Store Credit transaction.

Sending a Credit Memo Email
Navigate to the Sales Module / Customers and select the appropriate Customer.
1. Select the In-Store Credit tab.
Note: For more information on In-Store Credit, please see In-Store Credit Overview.
2. Click the Email icon associated with an In-Store Credit transaction.
Note: The email will pre-populate based on the saved template and can be edited prior to sending.
Related Articles
Customer Portal Direct Link Overview