Modifiers are optional add-ons that adjust how a Part is produced or priced. They provide flexibility in manufacturing and pricing by allowing specific enhancements or variations to be applied as needed. Common examples include adding grommets to a banner or applying lamination to printed vinyl.
Note: A modifier CANNOT be used in order entry on its own. It MUST be associated with a Part.
Table of Contents
Creating a Modifier
Each Modifier can include Custom Properties, which define informational or pricing-related attributes. Pricing Tiers determine how discounts (for Market-Based Pricing) or margins (for Cost-Plus Pricing) are applied based on Quantity Breaks and Customer Tiers. Finally, Modifier Formulas control how the Modifier’s components interact to calculate accurate pricing.
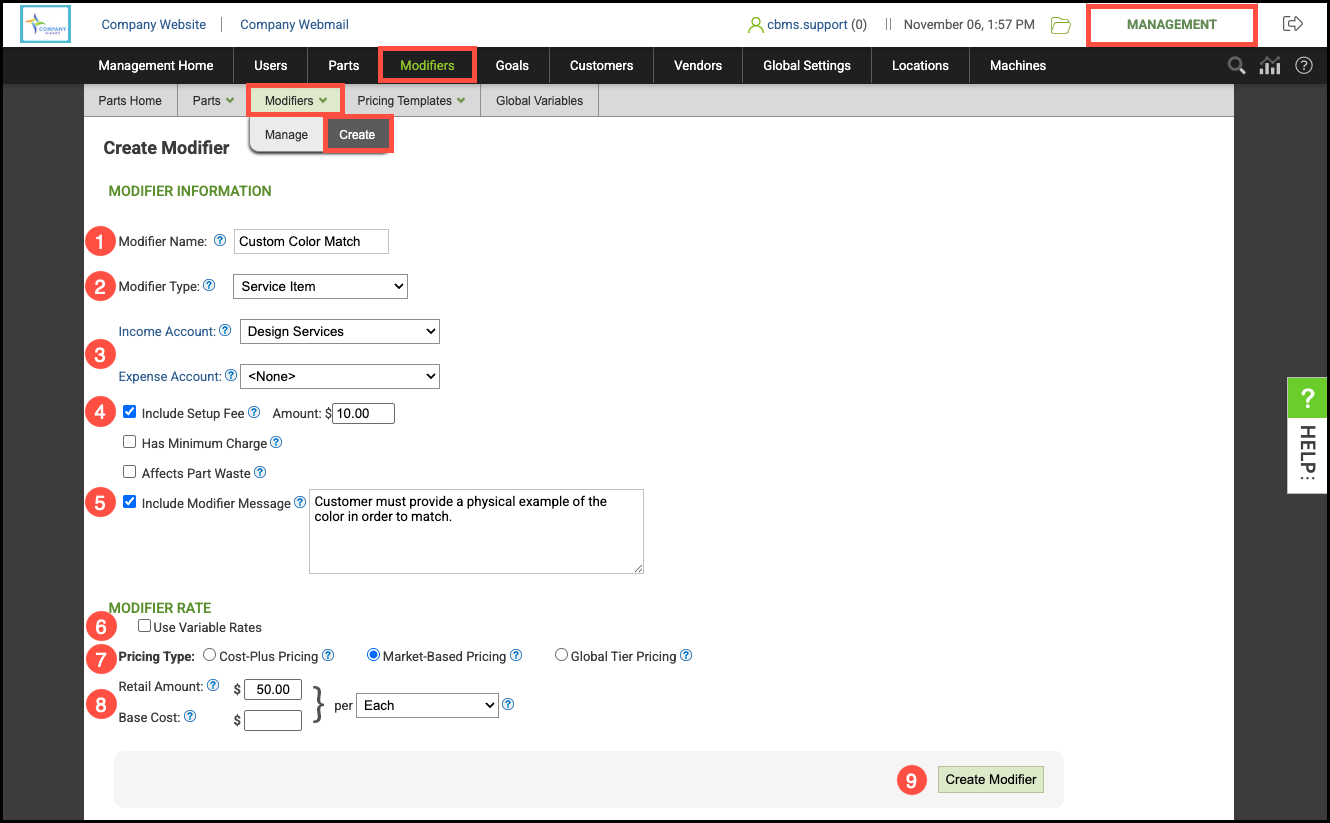
Navigate to Management Module / Modifiers / Create Modifier.
1. Enter the Modifier Name.
2. Enter the Modifier Type.
3. Assign appropriate Income Account and Expense Accounts.
4. Select any additional charges on the Modifier.
- Setup Fee
- Minimum Charge
- Affects Part Waste
Note: These settings are optional.
5. Select if you would like to include a message on Orders where the Modifier is used.
6. Select if you would like to use Variable Rates.
Note: Using Variable Rates allows you assign multiple pricing options on a single Modifier
7. Select your Pricing Type.
- Cost-Plus Pricing
- Market-Based Pricing
- Global Tier Pricing
8. Enter the pricing per unit values.
9. Click Create Modifier.
Additional Modifier Settings
a. Custom Properties
Custom Properties define how a Modifier interacts with the Part it’s associated with. After creating a Modifier, you’ll be prompted to add these properties. If you prefer, you can close the initial window and return to the Custom Properties tab later to create or edit them at any time. This flexibility allows you to refine how each Modifier influences production, pricing, or informational details as needed.
For more information, please see Adding Custom Properties to Modifiers.
b. Pricing Tiers
Modifier Pricing Tiers are used to give discounts based on quantities sold. These built-in discounts are automatically applied during Order entry and included in the product or line item total, remaining invisible to customers. You can configure pricing tiers using Maximum Discounts, Custom Discounts, or the Percentage Conversion Tool.
For more information, please see Modifier Pricing Tiers.
c. Modifier Formulas
Each Modifier requires a Modifier Formula to determine how its pricing is calculated. The formula defines the relationship between the Modifier’s components - such as quantity, dimensions, labor, or material cost - and ensures that pricing is applied accurately and consistently across Orders.
For more information, please see Modifier Pricing Formulas.