The Pricing Settings page allows you to define key financial and pricing defaults for your system. Here, you can set your shop’s labor cost per hour, establish other pricing-related defaults, and specify the next invoice number to be used. Configuring these settings ensures consistency across all pricing calculations and helps maintain accurate invoicing and reporting.
Note: Be sure to click Save Settings when making any changes to this page.
Table of Contents
Labor and Pricing Factors
Navigate to Management Module / Global Settings / Pricing Settings / Pricing Setting.

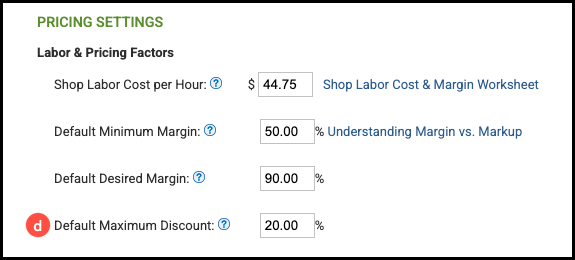
a. Shop Labor Cost per Hour
This value represents your true shop cost per hour, not the rate charged to customers. It should include labor and overhead expenses but exclude production machine costs, as those are calculated separately for each machine in your Machine Settings.

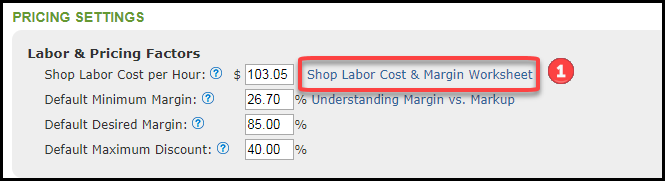
1. Click on the Shop Labor Cost & Margin Worksheet for help in calculating this values.
Note: The worksheet is only meant as a guide. Please make sure you have considered all variables and revise the values as necessary.

2. Fill in your Total Non-Payroll Expenses. This can be done by category or as a lump sum.
3. Click Go To Step 2.
4. Enter an employees name.
5. Choose an employee type.
- Billable: Any employee performing direct labor.
- Non-Billable: Any employee performing nondirect labor.
- Mixed: Any employee performing both.
6. Enter the total average gross pay this employee receives every month.
7. If the employee is Billable or Mixed, enter the number of hours each day spent doing billable work.
8. Once you've entered all of your employees, click Go To Step 3.
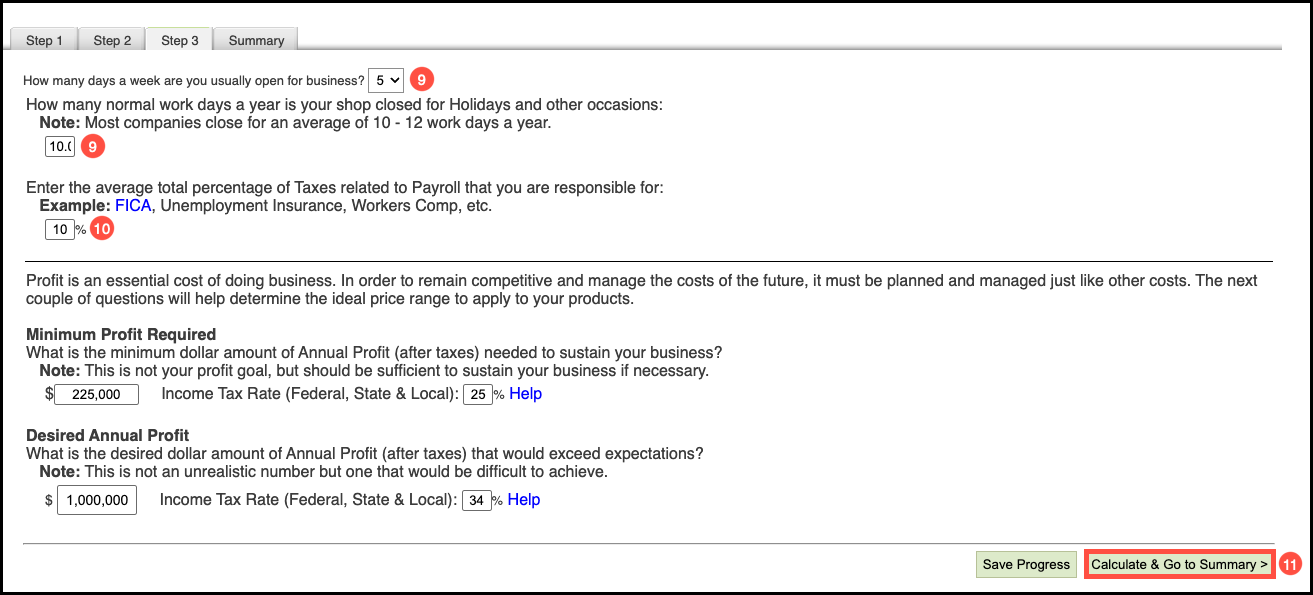
9. Enter the days of the week you are open for business and number of days per year you are closed for holidays.
10. Enter the average total percentage of Taxes related to Payroll.
11. Click Calculate & Go to Summary.
12. Review the information and click Save These Results and Close Worksheet.
Note: The shop Labor Cost per Hour will automatically populate with the information from the worksheet.
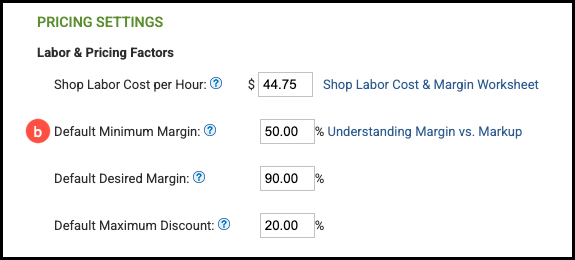
b. Default Minimum Margin
This value represents the minimum margin you want to maintain on average. It is applied to all parts using Cost-Plus pricing, unless a different margin is specified for an individual part.
1. Click on the Shop Labor Cost & Margin Worksheet for help in calculating this values.

2. Navigate directly to Step 3
Note: You should have already completed the other steps in the first section of this article.
3. Enter the Minimum Profit Required.
4. Click Calculate & Go to Summary.
5. Review the information and click Save These Results and Close Worksheet.
Note: The Default Minimum Margin will automatically populate with the information from the worksheet.
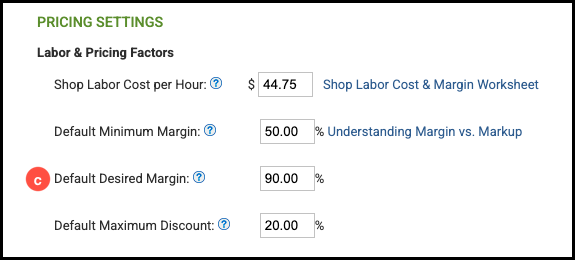
c. Default Desired Margin
This value represents the maximum desired margin you want to achieve on a product, on average. It serves as the default target margin for all parts using Cost-Plus pricing, unless a different margin is specified for an individual part.
1. For help calculating this value, click on the Shop Labor Cost & Margin Worksheet.
2. Navigate to Step 3 as you should've already completed the other steps in the first section of this article.
3. Enter the Desired Annual Profit.
Note: This number should be realistic but difficult to achieve.
4. Click Calculate & Go to Summary.
5. Review the information and click Save These Results and Close Worksheet.
Note: The Default Desired Margin will automatically populate with the information from the worksheet.
d. Default Maximum Discount
This value represents the maximum discount percentage you’re willing to offer on a product. It serves as the default discount limit for all parts using Market-Based pricing, unless a different limit is defined for an individual part.
Note: Because this discount is calculated from the Market-Based (retail) price you set on a part, be sure to review your pricing carefully before finalizing. This helps ensure that your discounts maintain the desired profit margin.
Invoice Numbering
The Invoice Numbering section allows you to view your current invoice number and set the next desired invoice number your system will use. It’s recommended to review and update these settings before going live to ensure numbering continues seamlessly from your previous system or starts at a sequence that fits your business needs.
a. Current Invoice Number - The number of the last created Invoice.
b. Enter Next Desired Invoice Number - Enter the next Invoice number you wish to use. This will be the starting number of the next Estimate or Invoice created in the system.
