How Does The Sync Process work?
- Review this entire article as well as any linked articles.
- Complete the setup steps.
- Let support know that the setup has been completed.
- A support agent will review your system.
- Once your system is ready a support agent will send a link to schedule a web meeting.
- A support agent will join you on a web meeting to perform your 1st sync.
Overview
This article will guide you through the process of setting up QuickBooks Desktop and CoreBridge to prepare for a data sync.
- If you have not Gone Live! with CoreBridge you can still perform these setup steps, however, the actual sync will not occur until you are Live and the sync requirements have been met.
- A CoreBridge support agent will perform the first sync with you on a web meeting. We don't recommend performing the first sync on your own.
- If you are entering orders or payments in a program other than CoreBridge, we recommend not entering that data again in CoreBridge so that you don't get duplicate data in QuickBooks.
- If you are entering payments in a program other than CoreBridge, we recommend keeping those bank deposits separate from your CoreBridge deposits.
- If your CoreBridge system has more than one Location, data from all locations will sync to the same QuickBooks company file.
- The sync and the reconciliation are 2 distinct processes. Reconciliations should be performed once your system is Live. The sync will happen after that.
- The sync is one-direction only, from CoreBridge to QuickBooks.
- Once you've gone through your 1st Sync, you should not edit/update/modify/delete any records that sync from CoreBridge to QuickBooks. QuickBooks effectively becomes "look but don't touch" for any records that have synced from CoreBridge.
Table of Contents
- Sync Requirements
- Related Articles
- E-Commerce Integration Requirements
- Step 1 – Perform a CoreBridge Reconciliation
- Step 2 - Configure QuickBooks Application Settings
- Step 3 – Match Income & Cost of Goods Sold Accounts
- Step 4 – Select an Accounting Export Option in CoreBridge
- Step 5 – Invoice Prefix & Numbering Format
- Step 6 – Review Employee Names
- Step 7 - Review Customer Names
- Step 8 - Review Vendor Names
- Step 9 - Review Items
- Step 10 - Download and Install the QuickBooks Desktop Sync Tool
- Step 11 - Accounts Receivable Account in QuickBooks
- Step 12 - Other Accounts in QuickBooks
- Step 13 - Notify Support That All Setup Steps Have Been Completed
Sync Requirements
Before the sync can happen the following requirements must be met.
- QuickBooks Desktop for Windows 2014 or newer. LINK: Accounting Export Options
- The Detail Sync export method is being used.
- QuickBooks Desktop is installed on a local computer. The software required for the sync will be installed on the same computer that QuickBooks is installed on. The sync software running on a hosted server is not supported. Your QuickBooks company file does not have to be on the same computer that QuickBooks is installed on.
- Your system must be Live.
- One or more Completed orders.
- One or more payments.
- One or more Reconciliations that contain payments.
Related Articles
Please take a few minutes to review the articles below as they will help to provide additional details on the sync process.
3rd Party Integration Requirements
- Pressero: Sales Tax must be synced as line items. This is a setting on the sync tool (Step 10)
- XMPie: Sales Tax must be synced as line items. This is a setting on the sync tool (Step 10)
- TaxJar: Sales Tax must be synced as line items. This is a setting on the sync tool (Step 10)
- Avalara: Sales Tax must be synced as line items. This is a setting on the sync tool (Step 10)
- When using the sync tool setting required for the noted integrations, the sales tax reports from QuickBooks will not work because tax will be recorded as line items. The CoreBridge sales tax reports must be used when preparing sales tax forms.
Special Characters
These are the characters that are allowed in CoreBridge but will cause the sync to fail: á, é, í, ó, ú, ñ, ü
STEP 1 – Perform a CoreBridge Reconciliation
READ ME
Each Reconciliation contains the payments that will export to QuickBooks. Without Reconciliations payments will not export.
A Reconciliation should be performed at the end of each business day to capture that day's payments and to catch any payment entry errors. If wrong payment amounts are captured on the Reconciliation the wrong amounts will sync to QuickBooks.
INSTRUCTIONS
Please refer to these articles for instructions:
STEP 2 – Configure QuickBooks Application Settings
Is this step optional or required? Required
INSTRUCTIONS
STEP 3 – Match Income & Cost of Goods Sold Accounts
READ ME
The only accounts needed for the sync are the accounts in CoreBridge. Be sure not to add your entire Chart of Accounts to CoreBridge.
If there is an account in CoreBridge that does not exist in QuickBooks, it will be created automatically in QuickBooks during your 1st sync so there is no need to add it manually. The new account in QuickBooks will be created exactly as displayed in CoreBridge (account number, account name, hierarchy). If you want to have an account created automatically, any parent account noted in CoreBridge will need to either be created by the sync or must already exist in QuickBooks. If you prefer to add an account manually to QuickBooks, be sure it matches exactly to CoreBridge.
ACCOUNT NAMING AND STRUCTURE
- Special characters may cause sync errors. Some examples are $, &, and quote symbols. Please use only letters and numbers for account names. If a special character causes a sync error, the account name will need to be changed in both CoreBridge and QuickBooks for the sync to be successful.
- The following account names should not be used for income accounts. The names need be used with items that get created on your first sync. If needed you can add "Income" or "Sales" to the name.
- Freight
- Postage
- Shipping
- Discounts
- Accounts can have 3 levels.
Parent > Child > Child
- If your existing Income and COGS accounts that will be used in CoreBridge have more than 3 levels please adjust them accordingly in QuickBooks before matching them to CoreBridge.
- Each account must have a unique account number and a unique name. Numbers and names cannot be the same between Income accounts and COGS accounts. If you want the sync to create an account for you in QuickBooks during the 1st sync, be sure that an account doesn't already exist in QuickBooks with the number or name of the account that will be created.
INSTRUCTIONS
DUPLICATE ACCOUNTS
For Example:
- One CoreBridge Account: 4000 Banner Income
- Two QuickBooks Accounts: 4000 Banner Income, 4500 Banner Income
- You will need to change 4500 so that is has a unique name
ACCOUNT MATCHING
- Match Income and COGS accounts between CoreBridge and QuickBooks.
- Account number, account name, account hierarchy, and account type must match exactly.
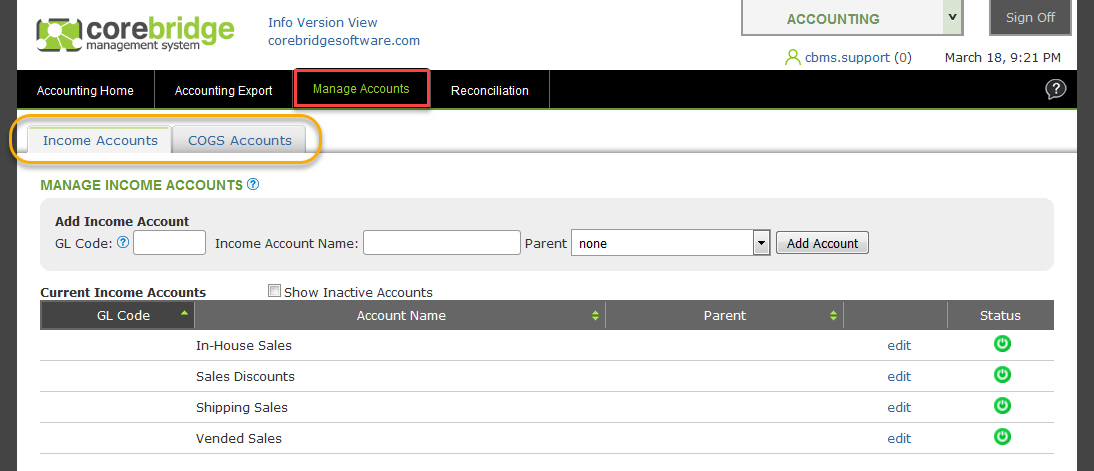
INCOME ACCOUNTS
- The QuickBooks account type needs to be "Income". Using type "Other Income" will create sync errors causing data to not export.
- In CoreBridge, navigate to Accounting Module > Manage Accounts > Income Accounts tab.
COGS ACCOUNTS
- The QuickBooks account type needs to be "Cost of Goods Sold". Using type "Expense" will create sync errors causing data to not export.
- In CoreBridge, navigate to Accounting Module > Manage Accounts > COGS Accounts tab.
- Costs from CoreBridge do not sync but the accounts themselves will sync only if:
- Your subscription includes the Purchasing Module AND
- You choose to sync purchase orders
WORKING WITH ACCOUNTS
- The column headings can be used to sort accounts. If the accounts have account numbers, try clicking GL Code once or twice to put the accounts in number order. If the accounts don't have numbers, sorting by Account Name may make the matching process easier.
- Once sorted, start with the first account in CoreBridge. Compare it to QuickBooks. If the CoreBridge account matches exactly to QuickBooks move on to the next account in CoreBridge. (You don't want to start with the first account in QuickBooks because all of your accounts in QuickBooks don't need to be in CoreBridge)
- If the CoreBridge account represents an account in QuickBooks but it doesn't match exactly, change the account in either QuickBooks or CoreBridge to get them to match.
- If you are a Franchisee, CoreBridge is populated with the Franchisor master Chart of Accounts so any change may need to be made in QuickBooks.
- The goal is to get the account to match perfectly between CoreBridge and QuickBooks.
- If a CoreBridge account needs to be changed, click edit, make any needed changes, then click save before moving to the next account.
- If the account being matched is a child account in QuickBooks be sure to select the parent account in CoreBridge so that the account hierarchy matches. If a parent account does not exist in CoreBridge it must be created.
- To create a new account use this section of the page:
- If you are a Franchisee, your accounts may be locked preventing new accounts from being created.

- If you are a Franchisee, your accounts may be locked preventing new accounts from being created.
STEP 4 – Select an Accounting Export Option in CoreBridge
IF YOU HAVE ALREADY SYNCED
If you have already synced with a different accounting application than QuickBooks Desktop or a with a different export method, stop here and contact CoreBridge support. Changing this option after data has been synced will create erroneous data in QuickBooks if a sync is performed with the new setting.
INSTRUCTIONS
If you have been in contact with a support agent this step will probably have been done for you.
- In CoreBridge, navigate to Accounting Module > Accounting Export.
- Select the following options:
- Select Export Type: Sync with Desktop Application
- Application Name: QuickBooks
- Sync Type: Full Data Sync
- Full Sync and Detail Sync are the same things.

- Click the Save button. A warning dialogue may appear. Since you have never synced you can safely click OK.
STEP 5 – Invoice Prefix & Numbering Format
READ ME
If your QuickBooks has customer invoices this step must be completed so that CoreBridge invoices will have different numbers than QuickBooks. If invoice numbers are the same between CoreBridge and QuickBooks the CoreBridge invoices will fail to sync.
INSTRUCTIONS
- In QuickBooks
- Report Center > Customers & Receivables > Transaction List by Customer
- Export the report to Excel and sort by Num. This will display the prefix as well as the last number used.
- Export the report to Excel and sort by Num. This will display the prefix as well as the last number used.
- Report Center > Customers & Receivables > Transaction List by Customer
- In CoreBridge view your Invoice Prefix setting: Management Module > Locations > (select a location) > Location & Company
- Make any needed change then click Save Changes.

- Make any needed change then click Save Changes.
- In CoreBridge view your invoice numbering: Management Module > Global Settings > Pricing Settings
- Make any needed change then click Save Settings.

- Make any needed change then click Save Settings.
STEP 6 – Review Employee Names
READ ME
If your QuickBooks has Employees this step must be completed so that there are no conflicting records. If you have sold to an Employee, that Employee may have a Customer account in CoreBridge.
If there is an Employee in QuickBooks with the same name as a Customer in CoreBridge the Customer will fail to sync which will also cause invoices to not sync.
INSTRUCTIONS
Compare your Employee list from QuickBooks against Customers in CoreBridge. If there is a match, the name will need to be changed in either CoreBridge or in QuickBooks so that there isn't a match.
STEP 7 – Review Customer Names
READ ME
If your QuickBooks has customers we highly recommend completing this step. If a customer exists in both QuickBooks and CoreBridge but the names do not match each other exactly, the sync will create a new customer in QuickBooks from the customer record in CoreBridge. All new transactions will sync to the new customer record. That will leave QuickBooks with duplicate customers:
- The original customer with the transactions that were recorded in QuickBooks
- The new customer with only the transactions from CoreBridge
INSTRUCTIONS
Compare all customers between CoreBridge and QuickBooks to be sure that the name is the same in both systems. (This includes spaces, dashes, and any other character)
STEP 8 – Review Vendor Names
READ ME
If your QuickBooks has vendors we highly recommend completing this step. Vendors from the Purchasing Module will sync to QuickBooks. Sales tax vendors will also sync. Each Tax Agency in CoreBridge will sync as a vendor in QuickBooks.
If a vendor exists in both QuickBooks and CoreBridge but the names do not match each other exactly, the sync will create a new vendor in QuickBooks from the vendor record in CoreBridge. All new transactions will sync to the new vendor record. That will leave QuickBooks with duplicate vendors:
- The original vendor with the purchase orders that were recorded in QuickBooks.
- The new vendor with only the purchase orders from CoreBridge.
INSTRUCTIONS
Compare Vendors in QuickBooks to (a) Vendors in CoreBridge and (b) Tax Agencies in CoreBridge to be sure that the name is the same in both systems. (This includes spaces, dashes, and any other character)
STEP 9 – Review Items
READ ME
If your QuickBooks has items we highly recommend completing this step. Part and modifiers from CoreBridge will sync to QuickBooks as items. The items will be used for Invoices and Purchase Orders. If an item exists in both QuickBooks and CoreBridge but the names do not match each other exactly, the sync will create a new item in QuickBooks from the part or modifier record in CoreBridge. All new transactions will use the new item record. That will leave QuickBooks with duplicate items:
- The original item with the transactions that were recorded in QuickBooks.
- The new item with only the transactions from CoreBridge.
In addition to the names needing to match, the type needs to match as well. The types available in CoreBridge and in QuickBooks are listed below:
- Inventory
- Non-Inventory
- Service
If the names match but the type doesn't match, the sync will attempt to update the item type in QuickBooks so that it matches CoreBridge. If there is activity on the item in QuickBooks that prevents the type from being changed, the sync will fail. That will result in the item not syncing and all transactions that use that item will also fail.
INSTRUCTIONS
A. If you use Closing Dates in QuickBooks, please review this article: LINK: QuickBooks Detail Sync - Closing Date
B. Compare all items in QuickBooks to parts and modifiers in CoreBridge. The following information should be the same in both QuickBooks and CoreBridge:
- Name (This includes spaces, dashes, and any other character)
- Type
- Income account
- COGS account (If the item in QuickBooks has inventory transactions, and the sync tries to change the account in QuickBooks, the item may fail if QuickBooks does not allow the change to be made. This happens because QuickBooks isn't allowing the beginning balance to change. If that happens the name will need to be changed in QuickBooks so that the sync can create a new item).
STEP 10 – Download and install the QuickBooks Desktop Sync Tool
INSTRUCTIONS
The software must be installed on the same computer that QuickBooks installed on.
If Windows does not have the required component installed that the software will need, you will be prompted to download and install it from a Microsoft website. This may require a computer restart.
Follow the steps in this article to download and install the software required for the sync: QB Desktop - Sync Tool Installation
NOTE: Please don't attempt to configure the sync tool or try to save the settings. A support agent will handle that on your 1st sync meeting.
IF YOU ARE USING THE Pressero, XMPie, TaxJar, or Avalara INTEGRATION:
Sales Tax must be synced as line items. There is a setting on the sync tool that needs to be selected and there are records that will need to be created in QuickBooks to use this option.
Please refer to this article: Sync Tax Agency Liabilities as Line Items
If you are setting up the sync tool on your own please follow the steps in the article before performing a sync.
If you are waiting for your 1st sync meeting, the support agent will assist with the setup.
STEP 11 – Accounts Receivable Account in QuickBooks
READ ME
On the Desktop Sync Tool, an Accounts Receivable account needs to be set for each CoreBridge location. Even though a different A/R account can be used for each location we recommend using the same account for all locations because there are times that multiple A/R accounts will cause the sync to fail.
INSTRUCTIONS
- If an Accounts Receivable account doesn't exist in QuickBooks it must be created.
- In QuickBooks, any A/R account to be used must be set as follows:
- The account must be a parent account
- The account type must be Accounts Receivable

STEP 12 – Other Accounts in QuickBooks
- These accounts need to exist in QuickBooks. If they don't exist please create them. If they do exist be sure that the account type is correct.
ACCOUNT ACCOUNT TYPE A bank account where payments are deposited Bank A petty cash account to reconcile your cash drawer Bank - This account needs to exist in QuickBooks. If it exists please be sure that the name and type match as noted. If it doesn't exist the sync will create it.
ACCOUNT NAME ACCOUNT TYPE Bad Debt Expense (not Other Expense) - If these accounts don't exist the sync will create them. There is no need to create them by hand. The account number noted will be used if the sync creates the account.
ACCOUNT NOTES NUMBER Undeposited Funds This is needed in order to record deposits 00001 Inventory Asset Other Current Asset account associated with inventory items 00002 Customer Refunds Income account associated with refunds 00003 Retail Sales Fallback income account if an income account cannot be found 00004 Cost of Goods Sold Fallback COGS account if a COGS account cannot be found 00005 In-Store Credit Expense account associated with In-Store credit 000089 Bad Debt Expense account associated with bad debt payments 000087
STEP 13 – Notify Support That All Setup Steps Have Been Completed
Once the entire setup has been completed, notify support by replying back to your "sync setup" ticket.
"The sync setup has been completed and I would like to proceed to the next step."
The agent assigned to your ticket will review your system to ensure that you have a successful First Sync. If any issues are found during the review that will cause the sync to fail, the agent will let you know what the issues are so that they can be fixed. Once the review is successful the agent will send a scheduling link that you will use to arrange your First Sync meeting.
The 1st Sync to QuickBooks Desktop will be performed with a CoreBridge Support specialist on the scheduled meeting.
We do not recommend performing a first sync on your own.