Market-Based Pricing is a flexible pricing method that starts with a maximum retail price per unit and then applies discounts based on the customer’s level and the total quantity ordered. This approach allows you to align your pricing with market expectations while still rewarding volume purchases and customer loyalty.
Instead of calculating prices from Cost and Margin (as in Cost-Plus Pricing), Market-Based Pricing focuses on the retail side of pricing, using discounts to reach the appropriate selling price. The system automatically determines the final customer price by applying the relevant discount percentage to the maximum retail value—ensuring consistency, transparency, and competitive pricing across different customers and quantities.
Table of Contents
Setting Retail Price
Navigate to Management Module / Parts / Parts and select the appropriate Part.
1. Click Part Settings.

2. Enter the Part Retail Price.
Note: This value represents the maximum retail price for the Part, entered using the same unit of measurement selected on the General tab (also displayed to the right of this field).
Example: If the Type of Pricing selected is Each then the Retail Price to enter would be your highest retail price for each Part. Use the Discount chart on the Pricing Tiers tab for discounts off this price.
3. Click Update.

Setting up Market-Based Pricing
Navigate to the Management Module / Parts / Parts and select the appropriate Part.
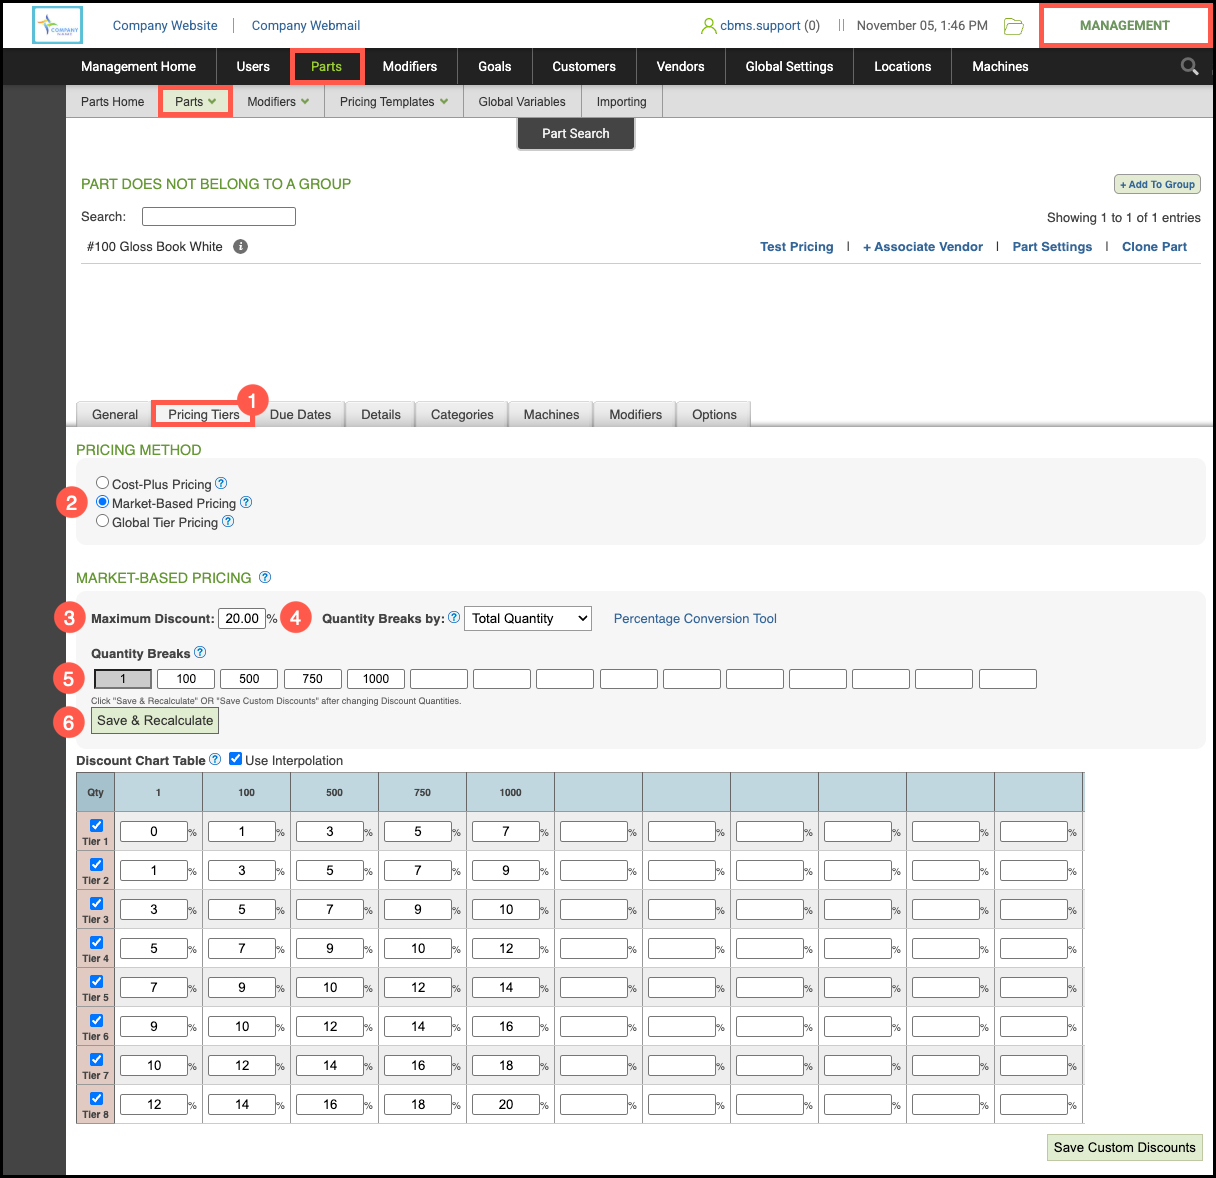
1. Select the Pricing Tiers tab.
2. Select Market-Based Pricing.
3. Enter the Maximum Discount.
Note: For more information on Discounts, see below.
4. Select how your Quantity Breaks will be determined.
5. Enter your desired Quantity Breaks into the cells below.
6. Click Save & Recalculate to auto populate the Margin Chart Table.
Discount Chart Table
a. Maximum Discount - This should be the greatest discount for this Part or Part Group.
Note: This discount will spread across the largest quantity break as well as all selected Pricing Tiers. These numbers will populate the Discount Chart Table below.
b. Percentage Conversion Tool - Customize individual dollar amounts by highlighting the price in the cell and entering the retail amount you want to charge based on quantity and Pricing Tiers.
Click Convert and Save. This will override any discount percentages entered on previous steps. See example below.
c. Interpolation automatically calculates a discounts between Quantity Breaks, ensuring smooth and accurate pricing for quantities that fall between your set breaks.
d. Custom Discounts - Click on a specific cell in the Discount Chart Table and enter the specific discount percentage you want. Click Save Custom Discounts to apply any new discounts.
Example:
