This article explains how to identify and report sync errors when connecting CoreBridge with QuickBooks. During a sync, errors appear as failed items and indicate transactions that were not successfully sent to QuickBooks. Addressing these errors promptly is important, as unresolved sync errors can result in incomplete or inaccurate financial data in QuickBooks.
Important Details
- Your export type is Summary Sync (Lump Sync)
- You are syncing to QuickBooks Online.
- A support ticket is needed for an agent to help fix errors.
- The support ticket must include error messages.
Table of Contents
Method One
This is the recommended method for reporting sync errors.
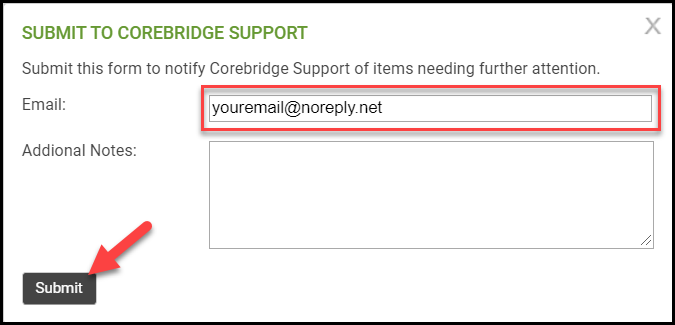
1. When the sync completes and there are failed items, click the Troubleshoot Problems button.

2. In the pop-up window, enter the email address where you want to get further information.
3. Click Submit.
After Submitting
- A support ticket is automatically generated.
- The ticketing system sends an email to the address that was entered.
- The sync error is recorded on your CoreBridge system.
- If needed, additional information will be requested.
- A support agent will either fix the issue in CoreBridge or send instructions on how to fix the issue in QuickBooks.
- Once the issue is fixed, run the sync again to ensure that the fix worked.
Troubleshooting
- If the automated email does not show up, something went wrong and a support ticket was not generated. If that happens, submit the error again. If you are unable to get a support ticket, use Method 2.
- If you still get errors, use either method to report the errors because they may be different errors than were reported originally.
Method Two
1.Clicked the link for one of the failed items.
Note: Do not click the Troubleshoot Problems button.

2. Take a screenshot of the error window that pops up.
Note: Ensure the screenshot is clear and readable. Take the image of just the error window, rather than the entire screen.
3. Save the screenshot to your computer so that it can be uploaded.
- If there is more than one failed items link, take a screenshot of the error window for each one.
- If all errors do not fit in a single screenshot, use the scroll bar to position any remaining errors.

4. Open a support ticket using either method:
- Log in to this website: support.corebridge.net
- Send an email to: support@corebridge.net
5. Attach the screenshot(s) to your support ticket.
After Submitting
- After a support ticket is opened, the ticketing system sends an email to the address that was used.
- A support agent will use the screenshot(s) to troubleshoot.
- If needed, additional information will be requested.
- A support agent will either fix the issue in CoreBridge or send instructions on how to fix the issue in QuickBooks.
- Once the issue is fixed, run the sync again to ensure that the fix worked.
Troubleshooting
- If the automated email does not show up, something went wrong and a support ticket was not generated. If that happens, try again or use a different method.
- If you still get errors, use either method to report the errors because they may be different errors than were reported originally.
Method Three
This method is used when you see a popup message rather than failed items.
1. Take a screenshot of just the popup window.
Note: Ensure the screenshot is clear and readable. Take the image of just the popup window, rather than the entire screen.
2. Open a support ticket using either method:
- Log in to this website: support.corebridge.net
- Send an email to: support@corebridge.net
3. Attach the screenshot(s) to your support ticket.
4. The process documented in Method 2 will then follow.