You can add and manage Vendor information in your CoreBridge system to streamline purchasing and supplier management. Adding Vendors allows you to associate Vendor-specific pricing with Parts, access Vendor details and Contacts, and efficiently create and manage Purchase Orders through the Purchasing Module.
If the Purchasing Module is not included in your CoreBridge package, you can still create Vendors in the Management Module when associating them with parts. Vendors added there will also appear in the Purchasing Module once available. For information on enabling the Purchasing Module, please contact support@corebridge.net.
Table of Contents
- Associating Vendors to Parts in the Management Module
- Creating Vendors in the Purchasing Module
- Editing Vendors in the Purchasing Module
- Activate/Deactivate Vendor
Associating Vendors to Parts in the Management Module
Associating Vendors to Parts allows you to enter certain Vendor information on individual Parts including Vendor Name, Vendor Part Number, and purchasing information. Vendors can be added in the Management Module when associating a Vendor to a Part. Vendors created here will be available for other Parts and will show in the Purchasing Module.
Navigate to Management Module / Parts / Parts Manage and select the appropriate Part.
1. Click Associate Vendor

From here you can either associate an existing Vendor, or create a new one.
Associating an Existing Vendor
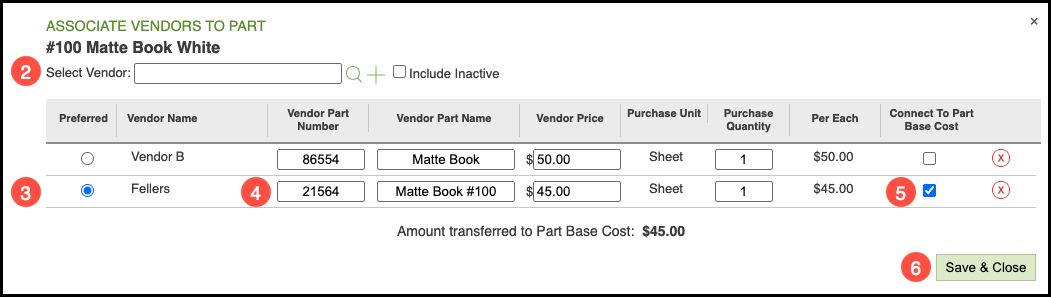
2. Type the Vendor name, select from the dropdown, or click the magnifying glass to search.
3. If entering multiple Vendors, select the preferred one.
4. Enter all Vendor information for the Part.
Note: If you enter a Vendor Part Number or a Vendor Price here, it will auto-populate when creating Vendor Purchase Orders.
5. Click Connect to Part Base Cost if desired.
Note: This will replace the part cost you have already entered with the Vendor cost shown here. Leaving the box unchecked will not change the price.
Note: For Parts with multiple Vendors, clicking Connect to Part Base Cost on each vendor will connect an average cost to the part.
6. Click Save & Close.
Associating a New Vendor
2. Click the Plus button.
3. Enter the Vendor information.
Note: Required fields are indicated.
4. Click Create Vendor.

Creating Vendors in the Purchasing Module
The Purchasing Module allows you to add Vendors. In the Purchasing Module, you can manage Vendors in addition to managing Purchase Orders and inventory.
Navigate to Purchasing Module / Vendors.
1. Select Create New.
2. Enter the Vendor information.
Note: Required fields are indicated.
3. Click Create Vendor.

Editing Vendors in the Purchasing Module
Navigate to Purchasing Module / Vendors.
1. Select Search.
2. Select the Vendor Name you wish to edit.
3. Add or update general information on the Vendor
4. Click Save Changes to Vendor.
5. Select the Contacts tab to view and edit contact information.
6. Click Save Changes to Vendor.

Activate/Deactivate Vendor
Navigate to Purchasing Module / Vendors.
1. Select Search.
Note: By default, only active Vendors will be listed.
2. Check the Show Inactive box to display inactive vendors in your search results.
3. Select Activate in the far right column of the vendor. The Vendor is now active in your system.
Note: Deactivating a Vendor follows the same steps, but you do not need to select the Show Inactive box.
