The CoreBridge Reconciliation is a daily closeout process designed to keep your financial records accurate and ready for export. It serves two primary functions:
Verifies payment accuracy so incorrect entries can be corrected before syncing.
Captures data needed for accounting sync/export.
The reconciliation process compares actual payments received to payments entered in CoreBridge, similar to how you reconcile a bank statement to your accounting records. Ensuring these values match is critical - if incorrect payment amounts are captured, they will persist in customer records and export to your accounting software. It’s always easier to fix discrepancies before they’re saved in a reconciliation.
Reconciling your system should take place at the end of each business day. If your system has multiple locations, a Reconciliation will need to be completed for each location.
If you are exporting CoreBridge data to your accounting software, payments will not export until they have been reconciled in CoreBridge.
Table of Contents
General Information
Performing a daily CoreBridge Reconciliation is critical to maintaining accurate accounting data.
If your CoreBridge system is Live, a reconciliation should be performed at the end of each business day.
Reconciliations can be performed before your first sync/export - there’s no need to wait.
For systems with multiple locations, each location must be reconciled daily.
Users can continue working while a reconciliation is in progress. Transactions entered during the process will appear in the next reconciliation.
The reconciliation date and time are set automatically when the Reconcile Accounts button is clicked. Dates cannot be changed.
Each reconciliation includes all financial activity between the previous and current reconciliation dates, including: Income, Bad Debt Expense, In-Store Credit, Payments, Accounts Receivable, Deposit Liability, and Sales Tax.

a. Reconciliations and Summary Sync
The values captured in each reconciliation are the values that sync or export to your accounting software. Without reconciliations, no data will sync.
Each reconciliation creates a journal entry in your accounting application.
For locations open six days per week, expect 20–25 reconciliations (and corresponding journal entries) per month.
b. Dates
The Reconciliation date is the end date, which is the date listed on the reconciliation record as "The Reconciliation Date".
c. Income Summary
Includes one journal entry line per income account captured.
d. Expense Summary
Includes one journal entry line for each expense type (e.g., Bad Debt, In-Store Credit).
Only active expense types appear on the entry.
e. Balance Sheet Information
Found on Page 2 of each reconciliation.
Displays Change values (what changed between the previous and current reconciliation).
Positive = increases the account balance.
Negative = decreases the account balance.
Example:
If Accounts Receivable decreases by $100, the A/R account balance in your accounting software will also decrease by $100.

f. Payments
Payments post to the Undeposited Funds account in your accounting software.
Deposits must be manually recorded to move payments into the correct bank account.
All payment types (except credit cards) post as summary amounts — individual payments do not sync.
Example:
If five checks totaling $500 are received, the journal entry will show one line for Checks – $500.00.

g. Payments – Credit Cards
Visa and MasterCard combine into one journal entry line.
Discover and American Express appear as separate lines.
Example:
$750.00 – Visa/MasterCard
$350.00 – Discover
$160.00 – American Express

Before recording deposits manually:
Confirm whether your merchant deposits Discover/Amex with Visa/MC or separately.
Determine whether fees are deducted per deposit. If so, record those fees at the same time for accurate reconciliation.
h. Reconciliations and Full Sync
Payments captured during each reconciliation will sync to your accounting application. Without reconciliations, payments will not sync.
In QuickBooks, payments post to Undeposited Funds; deposits must be recorded manually.
All payments sync individually.
Each payment (except refunds and NSFs) carries the same CoreBridge transaction number (CB-XXX).
Refunds and NSFs have unique numbers.
Refunds post directly to the bank account configured in your sync settings.
i. Viewing Payment Details
Individual payment details can be viewed during the reconciliation process or after completion.
To view payments click the link showing the number of payments in a section. The resulting window will display each transaction. See example below.
Note: # Transactions indicates how many orders were paid. A single payment may cover multiple orders.
Example:

Completing a Reconciliation
Gather Source Documents
Use these documents to verify actual amounts paid by Customers.
| PAYMENT TYPE | SOURCE DOCUMENT |
|---|---|
| Cash | Cash and receipts for cash purchases (from a cash drawer, box, till, etc) |
| Checks | Checks |
| EFT | 1. Report from the financial institution where EFT payments are processed. 2. e-mail or text notice |
| Credit Card | Report from your credit card processor. Could be from a terminal or online merchant website. |
| Other | Report from the source where Other payments are generated |
| Refunds | Could be any of the above |
Navigate to Accounting Module / Reconciliation.
1. Click the Reconcile Accounts button to begin reviewing your payments.
2. Select a Location.
Note: All payment information since the last reconciliation is retrieved and should be reviewed and verified. For more information, please see Review and Verify Payments and Refunds below.
3. Enter any Notes that you want to save along with this reconciliation.
4. Click Go To Step 2.
Note: If there are any discrepancies, the system will not allow you go proceed to Step 2 to complete the Reconciliation. See example below.

Example:

Note: To have accurate financial records, review the information provided. If a payment was entered incorrectly, close the Reconciliation window, return to the Sales Module, correct the payment, then start the Reconciliation process again. See below for more detailed information.
5. Click Reconcile Now.
Note: This will save the Reconciliation for later viewing and lock all reconciled payments.

Note: Once you have successfully completed a reconciliation, the reconciled payments can no longer be edited. If the wrong amount was reconciled, you will need to add additional payments or refunds in order to get to the actual amount of the payment.
Review and Verify Payments and Refunds
- For each payment type, calculate totals using your source documents.
- Enter totals in the Actual Counted box.
- The Calculated Total is CoreBridge’s system total.
- Both values must match for the reconciliation to save.
If differences exist:
1. Close the reconciliation.
2. Identify and correct discrepancies.
3. Start the reconciliation again.
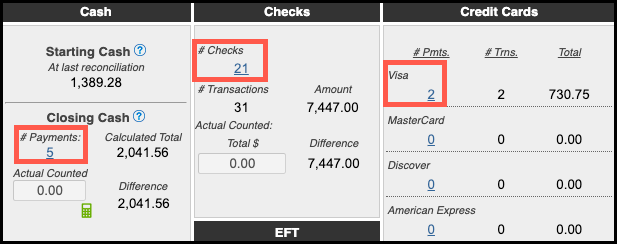
Cash
The Cash section not only helps in Reconciling your cash payments for the day but it also helps you balance your petty cash (cash drawer). If you are syncing/exporting, the cash total should be the same in three places after your sync/export and after making deposits in your accounting software:
- Cash Drawer
- Ending Cash on the most recent reconciliation
- The Petty Cash account in your accounting software
a. Starting Cash - The amount you had in your register at the end of your last reconciliation.
b. Payments - Clicking on the underlined number will open a pop-up allowing you to see payment details.
c. Actual Counted - The amount of cash in your register, including any amount that was taken out for purchases.
Note: When cash is removed from your register we recommend placing a note or receipt in the register. The note or receipt should be counted as cash. Enter the total in the Actual Counted field.
d. Cash In - The amount of cash that was added to your register that is not from a customer payment.
Note: This increases Ending Cash.
You typically only do this on your first reconciliation so that CoreBridge matches what was already in your register. You can add an amount at any time if you decide to increase what you keep in your register.
e. Cash Out (Paid Out) - Any amount that was taken out for purchases; e.g., cash used for an office party. This amount is included in the Actual Counted field.
Note: This decreases Ending Cash.
f. In the Cash Out (To Deposit) field, enter the amount of cash being deposited.
Note: This decreases Ending Cash.
g. Ending Cash - This amount is equal to what will be left in your register after the Reconciliation is completed. Ending Cash will be Starting Cash on the next Reconciliation.

Additional Cash Information
Cash Adjustments
- Cash In: This amount will not sync/export. If the amount needs to be recorded in your accounting application it will need to be recorded manually.
- Cash Out (Paid Out): This amount will not sync/export.
- Cash Out (To Deposit): This amount will sync/export.
Cash with Lump Sync
- Cash Out (To Deposit): The memo in your accounting software will be "Cash Out (Deposit)" and the amount should always be posted to a bank account.
- When you receive cash payments and a portion will remain in your cash drawer, the memo in your accounting software will be "Cash (Other)" and the amount should always be posted to a petty cash account.
- To summarize, when recording cash deposits:
- "Cash Out (Deposit)" should always be deposited to a bank account
- "Cash (Other)" should always be deposited to a petty cash account
Checks
A payment type of Check should represent an actual physical check that can be brought to the bank. Even if you use remote check deposit by scanning or taking a picture of a check, the payment type should still be "Check" since you were given an actual check.
- Total all checks
- Enter the value in Actual Counted: Total $
- If difference = 0 there is nothing else to do.
- If there is a difference, close the reconciliation, fix the problem, then start a new reconciliation.
a. # Checks - Represents the actual number of checks received.
b. # Transactions: Represents the number of times a payment has been applied to an invoice.
c. Actual Counted Total - Sum up the total of all checks and enter that total in the Actual Counted field.

EFT (Electronic Funds Transfer)
A payment type of EFT should represent an electronic payment. This section groups both EFT types: ACH and Wire.
- Determine the total of all EFT payments from source documents.
- Enter the value in Actual Counted: Total $
- If difference = 0 there is nothing else to do.
- If there is a difference, close the reconciliation, fix the problem, then start a new reconciliation.
a. # Payments - Represents the actual number of payments received.
b. # Transactions: Represents the number of times a payment has been applied to an invoice.
c. Actual Counted Total - Sum up the total of all EFT transactions and enter that total in the Actual Counted field.
Note: ACH and Wire transaction types are included.

Credit Cards
A payment type of Credit Card should represent a payment processed through a credit card processor.
- Determine the total of all credit card payments from source documents.
- Enter the value in Actual Counted: Total $
- If difference = 0 there is nothing else to do.
- If there is a difference, close the reconciliation, fix the problem, then start a new reconciliation.
a. # Payments - Represents the actual number of payments received.
b. # Transactions: Represents the number of times a payment has been applied to an invoice.
c. Actual Counted Total - Sum up the total of all credit card transactions and enter that total in the Actual Counted field.
Note: The amount should include payments only, not credit card merchant fees.

Other
A payment type of Other should represent a payment that doesn't fit the other categories. (e.g. clearinghouse, barter)
- Determine the total of Other payments from source documents.
- Enter the value in Actual Counted: Total $
- If difference = 0 there is nothing else to do.
- If there is a difference, close the reconciliation, fix the problem, then start a new reconciliation.
a. # Payments - Represents the actual number of payments received.
b. # Transactions: Represents the number of times a payment has been applied to an invoice.
c. Actual Counted Total - Sum up the total of all other transactions and enter that total in the Actual Counted field.
Note: The payment type Other is used when no other payment type applies. Other may not actually be a payment. It can be used when you need to close an order so that it doesn't appear on your A/R report. It can be used if you need to record a clearinghouse payment.

Refunds
A Refund can be any payment type.
- Click the link under # Payments
- A new window will appear showing the refunds entered by users.
- Review each refund to determine if it is valid.
- If there is a refund that is not valid, close the reconciliation, fix the problem, then start a new reconciliation.
- If all refunds are valid, close the transaction window then enter the value from Amount in Actual Counted: Total $
a. # Payments - Represents the actual number of refunds.
b. # Transactions: Represents the number of times a refund has been applied to an invoice.
c. Actual Counted Total - Sum up the total of all refunds and enter that total in the Actual Counted field.
Note: These transactions should be reviewed for accuracy as part of the reconciliation process.

In-Store Credit, Bad Debt, and Voided Orders.
These three sections don't require an entry. They are for review only.
In-Store Credit
This section displays In-Store Credit activity.
- Manual addition of credit
- Manual reduction of credit
- Refunds to in-store credit
- Refunds from prior credit given
Bad Debt
This section displays Bad Debt payment activity.
Voided Orders
This section displays orders that have been voided.
a. # Transactions - Represents the number of times In-Store Credit has been applied to an invoice.
b. # Payments - Represents the number of Bad Debt payments made.
c. # Transactions - Represents the number of times Bad Debt payments were applied to an invoice.
d. View Details - If there are any voided orders, clicking this will open a pop-up with more information.
Note: These transactions should be reviewed for accuracy as part of the reconciliation process.

Understanding Financial Activity Captured in Reconciliation
This is found under Step 2 in the Reconciliation Process.
a. Income Summary
- Income is recognized when an order is completed or when a completed order is voided.
- In these instances revenue will be recognized in the appropriate income accounts. Each income account that has revenue will be shown along with the amount.
- If you click the Income Summary link the details window will open.
b. Expense Summary
- Bad Debt: the total of Bad Debts payments
- In-Store Credit: Total of manual additions or reductions of in-store credit.
c. Payments Received
- The total amount of payments entered is displayed for each payment type.
- Cash, Check, EFT, Credit Cards, Other and Refunds reflect the amounts that affect your bank account.
- Refunds, regardless of payment type, will be shown on the refunds row.
- In-Store Credit shows payments made toward invoices using available In-Store Credit. This amount should not affect your bank account.
d. Balance Sheet Information
The balance sheet section provides a snapshot of your Asset and Liability values. There are two columns:
- Change: The change in value between Previous Reconciliation Date and This Reconciliation Date.
- Current: The current value as of This Reconciliation Date
e. Assets
- Undeposited Funds: The value that will reflect in your bank account. The value matches SubTotal in the Payments Received section.
- Accounts Receivables: The amount your customers owe you.
- Orders in WIP: The total of orders with a WIP order status, not including sales tax.
- Order in Built: The total of orders with a BUILT order status, not including sales tax.
f. Liabilities
- In-Store Credit: The amount of credit that your customers have with your company.
- Deposits: The amount of payments made toward an order that has not yet been completed. When an order is completed the liability is reduced.
- Orders Not Complete: The total of orders with a WIP or BUILT status, not including sales tax, that the company has committed to produce.
- Sales Tax: The change for this reconciliation period. Generated when an order is completed or when a completed order is voided.

Viewing Completed Reconciliations
Navigate to Accounting Module / Reconciliation.
The Reconciliation History section contains all completed Reconciliations
a. Use the Search box to find exact information.
b. Filter by Date boxes and the Filter by Location dropdown to narrow down what is displayed.
c. Group - Checking this box gives you options to group reconciliations together. For more information, please see Reconciliation Grouping.
d. Id - The Reconciliation number that is automatically assigned to each Reconciliation.
e. Location- The Location (Sales Center) that was reconciled. Click the name to open the Reconciliation.
f. Date - The timestamp from when the Reconcile Accounts button was clicked.
Financial data for the specific location up to the noted date and time is included. Anything after the timestamp will be included on the next reconciliation for the specific location.
g. Cash Adjustments - Cash In minus Cash Out (Paid Out)
h. Total Collected - The total of all payments received.
i. Created By - The CoreBridge User that completed the reconciliation.

Print Reports
Once a Reconciliation has been saved, the Reconciliation reports can be printed.
- Reconciliation Report - The report displays the following information:
- Summary values from Page 2
- Cash breakdown
- Individual payment details
- To print payment details, open a completed Reconciliation and click the Print Report button.

- Deposit Slip - The deposit slip lists the amount of cash entered in Cash Out (To Deposit) and each individual check that was entered.
- The location address from the Management Module is displayed.
- If you use the CoreBridge deposit slip to make a deposit, be sure to write the account number. CoreBridge does not store bank account numbers.
- To print a deposit slip, open a completed Reconciliation and click the Print Deposit Slip button.

Frequently Asked Questions
1. Question: What information is shown on a Deposit Slip?
Answer: The amount entered in Cash Out (To Deposit) and all checks.
Examples:


2. Question: Is the bank account number displayed?
Answer: If you use the CoreBridge deposit slip when making a deposit, manually write in the account number. The account number is not stored in CoreBridge.